
Montage Tutorial: m101 Mosaic
In this example, we will create a mosaic of 10 2MASS Atlas images in a 0.2 degree area around m101 in the J band, reprojecting them into the TAN projection. We will generate both background-matched and uncorrected versions of the mosaic. The final product will be two mosaics of m101 and their corresponding area images.
Area images are described more thoroughly in the algorithms section. They are used by Montage when co-adding images together to form a mosaic; once the final product has been created, they no longer need to be kept.
| 2MASS Atlas Input Images: | Output Mosaics: | |
| Width: | 512 | 2259 |
| Height: | 1024 | 2199 |
| Projection: | SIN (Orthographic) | TAN (Gnomonic) |
In this tutorial, what the user types is shown after a $ prompt, as following:
$ user input
Program output will be highlighted in bold, i.e.:
[struct stat="OK"]
You should make sure that the Montage executable directory (Montage_vX.Y/bin) is in your path before starting this tutorial (see Step 5 in Building Montage); otherwise, you will need to explicitly refer to the executables in order to run them.
Note: Times shown will differ between systems.
Step One: Setup
Download http://montage.ipac.caltech.edu/docs/m101Example/tutorial-initial.tar.gz (15.4 MB). To uncompress the file, type the following:
- $ gunzip tutorial-initial.tar.gz
- $ tar xvf tutorial-initial.tar
This will create a directory called m101, with five subdirectories: rawdir containing the original 2MASS images, projdir for the reprojected images, diffdir for the difference images, corrdir for the background-matched images, and final for the finished mosaics.
The total disk space taken up by these files is 20.7 MB.
The header template (template.hdr) is in the main m101 directory. This template is for a TAN projection, whereas the original 2MASS images are all in the SIN projection. They could just as easily be reprojected back into SIN or any of the other supported projections.
Note: The header template was generated so that the area covered completely encloses each input image. See Caveat #5 for more information on why this is necessary in this release of Montage.
The m101 directory can be located anywhere on your system, as long as the Montage bin is in your path.
Resulting directory structure:
m101/
  |--rawdir/
  |    |--10 2MASS atlas images, SIN projection
  |
  |--projdir/
  |--diffdir/
  |--corrdir/
  |--final/
  |--template.hdr
Step Two: Reproject images.
Generate an image metadata table describing the contents of rawdir:
- $ mImgtbl rawdir images-rawdir.tbl
- [struct stat="OK", count=10, badfits=0]
where:
| rawdir | Name of the directory containing the images to be reprojected |
| images-rawdir.tbl | Output image metadata table |
Output file: images-rawdir.tbl.
Using this metadata table, run mProjExec to reproject each image:
- $ mProjExec -p rawdir images-rawdir.tbl template.hdr projdir stats.tbl
- [struct stat="OK", count=10, failed=0, nooverlap=0]
where:
| rawdir | Name of the directory containing the images to be reprojected |
| images-rawdir.tbl | Image metadata table describing the files |
| template.hdr | Header template for the mosaic |
| projdir | Directory into which reprojected images will be written |
| stats.tbl | Name of the output table containing processing times and status for each image |
This step may take several minutes, depending on processor availability. Since the input 2MASS images are in a tangent-plane projection, mProjExec can make use of the fast-reprojection algorithm (mProjectPP), saving some time.
This creates a set of reprojected images in the directory projdir, and a table showing processing times for each image: stats.tbl. After the images have been reprojected, generate a new metadata table that contains the new header information:
- $ mImgtbl projdir images.tbl
- [struct stat="OK", count=10, badfits=0]
New metadata table: images.tbl.
Step Three: uncorrected mosaic
Now we will generate a mosaic from the reprojected images without applying any background matching. Run mAdd on projdir:
- $ mAdd -p projdir images.tbl template.hdr final/m101_uncorrected.fits
- [struct stat="OK", time=8]
where:
| projdir | Name of the directory containing the reprojected images |
| images.tbl | Image metadata table describing the files |
| template.hdr | Header template for the mosaic |
| final/m101_uncorrected.fits | Name of the output file to be created |
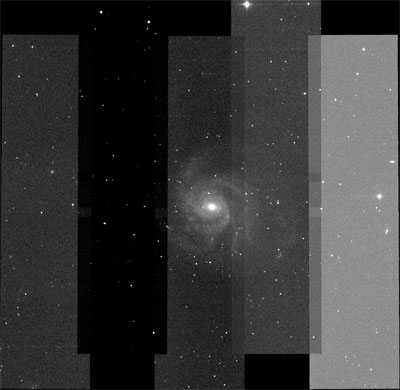
Uncorrected mosaic:
m101_uncorrected.fits
m101_uncorrected_area.fits
This step generally runs in under a minute.
To create a grayscale JPEG of the output:
- mJPEG -gray final/m101_uncorrected.fits 20% 99.98% loglog -out final/m101_uncorrected.jpg
- [struct stat="OK", min=80.747, minpercent=20.00, max=180.914, maxpercent=99.98]
Step Four: Background Modeling
In order to smooth out the background levels between overlapping images, Montage creates a set of difference images from each pair of overlaps and fits a plane to each one.
First, Montage needs to know which images overlap, which can be determined using mOverlaps:
- $ mOverlaps images.tbl diffs.tbl
- [struct stat="OK", count=17]
where:
| images.tbl | Image metadata table describing the files |
| diffs.tbl | Name of the output table to be generated |
This generates the file diffs.tbl, and should take several seconds to finish
mDiffExec uses this file to subtract each pair of overlapping images, creating a set of difference images in the specified diffdir subdirectory:
- $ mDiffExec -p projdir diffs.tbl template.hdr diffdir
- [struct stat="OK", count=17, failed=0]
where:
| projdir | Name of the directory containing the reprojected images |
| diffs.tbl | Name of the differences table generated by mOverlaps |
| template.hdr | Header template for the mosaic |
| diffdir | Directory into which the difference images will be written |
The length of time necessary to run mDiffExec will depend on the number of difference images being generated, but it will take less time than mProjExec.
Output directory: diffdir.
Next, use mFitExec to calculate plane-fitting coefficients for each difference image:
- $ mFitExec diffs.tbl fits.tbl diffdir
- [struct stat="OK", count=17, failed=0, warning=0, missing=0]
where:
| diffs.tbl | Differences table generated by mOverlaps |
| fits.tbl | Output table containing plane-fitting coefficients |
| diffdir | Directory containing the difference images |
This process, which takes several seconds, creates the plane-fitting metadata table: fits.tbl.
Step Five: Background Matching
Now that Montage has calculated the best way to smooth out the overlap regions using the difference images, it needs to apply the background removal to the original reprojected images.
The first step is creating a table of corrections that need to be applied to each image using mBgModel:
- $ mBgModel images.tbl fits.tbl corrections.tbl
- [struct stat="OK"]
where:
| images.tbl | Image metadata table containing information on the reprojected images |
| fits.tbl | Plane-fitting table generated by mFitExec |
| corrections.tbl | Global corrections table to be generated. |
Resulting corrections table: corrections.tbl.
Next, use mBgExec to actually apply the background matching to each reprojected image:
- $ mBgExec -p projdir images.tbl corrections.tbl corrdir
- [struct stat="OK", count=10, nocorrection=0, failed=0]
where:
| projdir | Directory containing the reprojected images |
| images.tbl | Image metadata table describing the reprojected images |
| corrections.tbl | Set of corrections generated by mBgModel |
| corrdir | Directory into which the corrected images will be placed |
This creates a set of background-matched, reprojected images in the directory corrdir.
Neither of these steps should take more than a few seconds.
Step Six: Corrected Mosaic
To coadd all the reprojected, smoothed images into your final mosaic:
- $ mAdd -p corrdir images.tbl template.hdr final/m101_mosaic.fits
- [struct stat="OK", time=1]
where:
| corrdir | Directory containing the reprojected and background-corrected images |
| images.tbl | Image metadata table describing the reprojected images |
| template.hdr | Header template for the mosaic |
| final/m101_mosaic.fits | Name of the output mosaic |
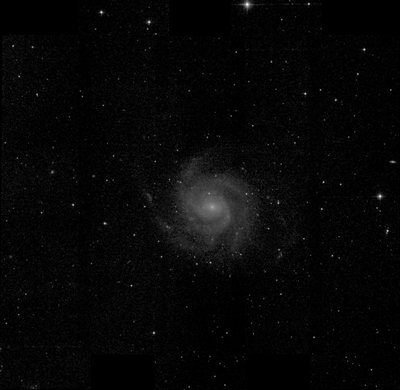
Final output:
m101_mosaic.fits
m101_mosaic_area.fits
To create a grayscale JPEG of the output:
- mJPEG -gray final/m101_mosaic.fits 0s max gaussian-log -out final/m101_mosaic.jpg
- [struct stat="OK", min=82.7157, minpercent=50.00, max=9628.28, maxpercent=100.00]
Note: Once your final product has been generated, you no longer need to keep all the intermediate files (projdir, diffdir, corrdir, and all area images).
